Quick answer
Mapping DIY cluster lashes for hooded eyes requires measuring visible length with your eyes open in a neutral forward gaze, rather than closed. Because excess eyelid fold skin rests over the mobile crease, standard maps can conceal lash roots or cause clusters to droop. By anchoring featherweight lash clusters 1mm underneath the natural lash line, choosing sharp D or L curls that clear the lid overhang, and focusing maximum length above the iris in an Open-Eye map, you achieve an open, lifted look that stays secure without pinching or eyelid friction.
Understanding Hooded Eyelid Anatomy: Why Eyelashes Disappear Behind the Fold
Hooded eyelids present a unique biomechanical challenge for DIY cluster lash enthusiasts. Unlike monolid or prominent protruding eyes where the entire eyelid space remains accessible throughout facial movement, hooded eyes feature an upper fold of skin that descends from the brow bone and drapes over the natural crease. When your eyes are closed, relaxed, or tilted downward toward a makeup mirror, the mobile lid appears spacious and smooth. However, the instant you open your eyes and look straight ahead in a neutral forward gaze, that overlying fold drops into place. This dynamic compression physically conceals between 2mm and 4mm of the natural lash base, creating the frustrating optical illusion that your lash clusters have vanished or shrunk.
Beyond concealing length, hooded skin creates downward mechanical pressure against the upper surface of your natural lashes. When traditional full-strip false eyelashes are applied above the lash line, the rigid band collides directly with this descending crease fold. Every blink causes the skin to rub against the band, resulting in inner-corner detachment, painful poking, and a heavy downward tilt that drags the eye downward. Segmented DIY lash clusters placed underneath the natural lash line provide the definitive architectural solution. By anchoring featherweight fiber clusters beneath your natural lashes, the attachment band remains completely protected from eyelid fold friction, preserving comfort and extending wear longevity.
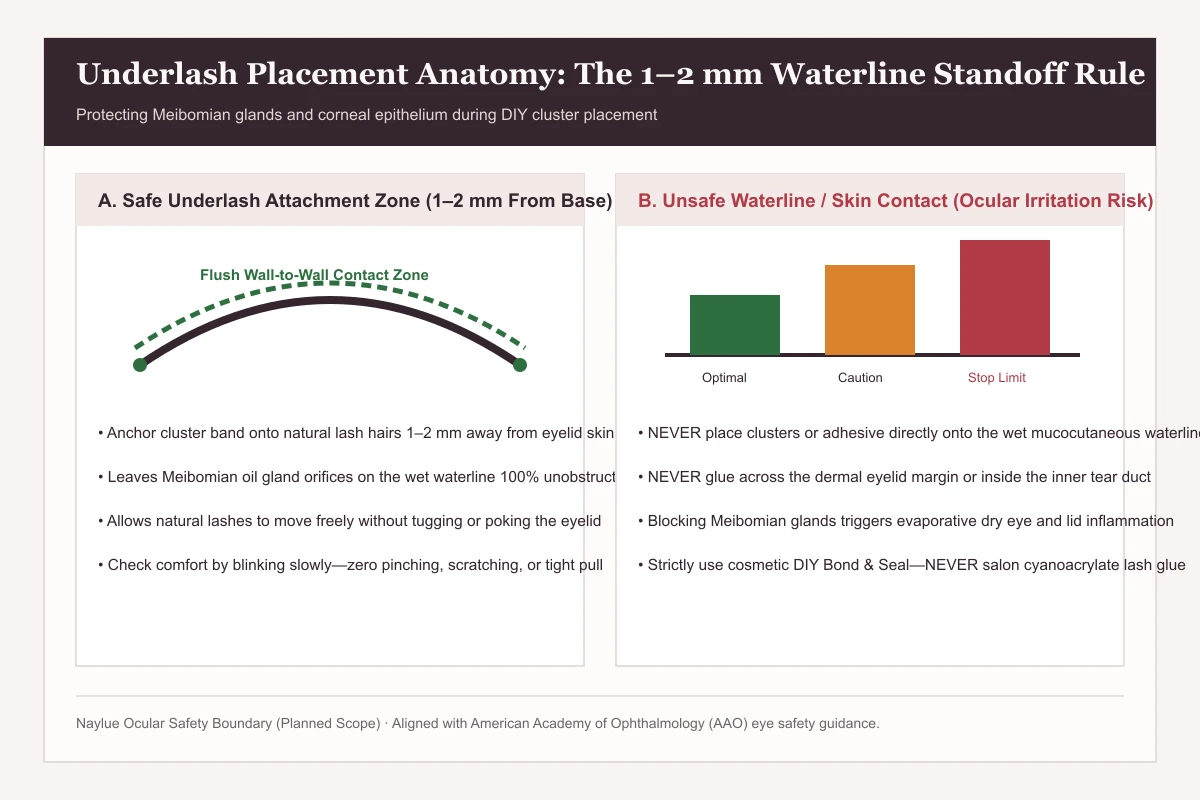
The fundamental rule of successful DIY lash cluster mapping on hooded eyelids is maintaining a precise 1mm safety standoff from the wet waterline. Placing adhesive or cluster bands directly onto the moist mucosal waterline or against the eyelid margin blocks the vital meibomian gland openings, leading to immediate ocular irritation, watery eyes, and rapid adhesive dissolution. Instead, each cluster must be adhered exclusively to the undersides of your natural lash hairs, positioned approximately 1 millimeter away from the skin. This micro-gap allows your natural eyelid margins to flex and hydrate naturally without pinching.
Under-lash placement also delivers a flawless, invisible seam that traditional strip lashes cannot replicate on hooded eyes. Because the micro-band sits flush against the bottom of your lash roots, the heavy upper lid fold cannot push or dislodge the seam from above. Furthermore, the overlapping natural lash canopy acts as an organic cushion, concealing the cluster band even when you look down. This structural positioning ensures that as the hooded crease shifts during normal facial expressions, the lash clusters maintain their calibrated angle of projection rather than twisting out of alignment.
Comparing Lash Cluster Mapping Styles for Hooded Eyes: Open-Eye vs Cat-Eye vs Doll-Eye
Selecting the best lash map for hooded eyes requires balancing horizontal eye width against vertical eye opening. The most common mistake is applying a traditional dramatic cat-eye map that concentrates the longest clusters at the extreme outer edge. In hooded eyes, the eyelid fold is typically heaviest at the outer corner, meaning that long, weighty clusters (such as 14mm or 16mm) placed at the outer corner are pushed downward by the skin overhang, creating a tired or drooping aesthetic. To counteract this downward vector, specialized lash maps reposition the focal length zone toward the center and middle-outer thirds of the eyelid.
An Open-Eye map (often referred to as a reverse cat-eye or iris-accent map) places the longest lash clusters directly above the iris, while tapering down smoothly toward both the inner and outer corners. This vertical architecture creates an optical dome effect, drawing attention directly to the center of the eye and making the eye aperture appear larger, rounder, and noticeably brighter. In contrast, a Modified Cat-Eye (or Kitten-Eye) map achieves an elongated, winged effect without the drooping trap by placing the longest cluster at Zone 4 (just before the outer edge) and stepping down to shorter, lighter clusters at the true outer corner.
| Mapping Style | Cluster Length Progression | Recommended Curl Profiles | Focal Density Zone | Hood Clearance Rating | Best Eyelid Subtype |
|---|---|---|---|---|---|
| Open-Eye (Iris Dome) | 8mm - 10mm - 12mm - 14mm - 12mm - 10mm | D-Curl Center, C-Curl Corners | Center 3/5 directly over pupil | Exceptional (Maximum vertical lift) | Heavy central hoods, downturned hooded eyes, deep-set eyes |
| Modified Cat-Eye (Soft Kitten) | 8mm - 10mm - 11mm - 13mm - 12mm - 10mm | C-Curl Inner, L-Curl or D-Curl Outer | Zone 4 (Outer-middle quadrant) | High (Prevents outer droop) | Almond hooded eyes, outer-corner hooded folds |
| Doll-Eye (Uniform Volume) | 9mm - 11mm - 12mm - 12mm - 12mm - 10mm | Consistent D-Curl across center | Uniform across Zones 2, 3, and 4 | High (Open rounded aperture) | Monolid hooded eyes, wide-set hooded eyelids |
| Wispy Manga Accent | 8mm base with 11mm, 13mm, and 14mm spikes | L+-Curl spikes over C-Curl base | Alternating vertical peaks across lid | Exceptional (Dimensional texture) | Even hoods, hooded eyes seeking textured airy definition |
Source & basis: Naylue beauty editorial testing protocol across 40 DIY cluster wear cycles evaluating lid fold clearance, curl retention, and ocular comfort on hooded eyelids.
Curl Profiles for Hooded Creases: The Science of C, D, and L Curls
Navigating the Eyelid Overhang with Engineered Curl Angles
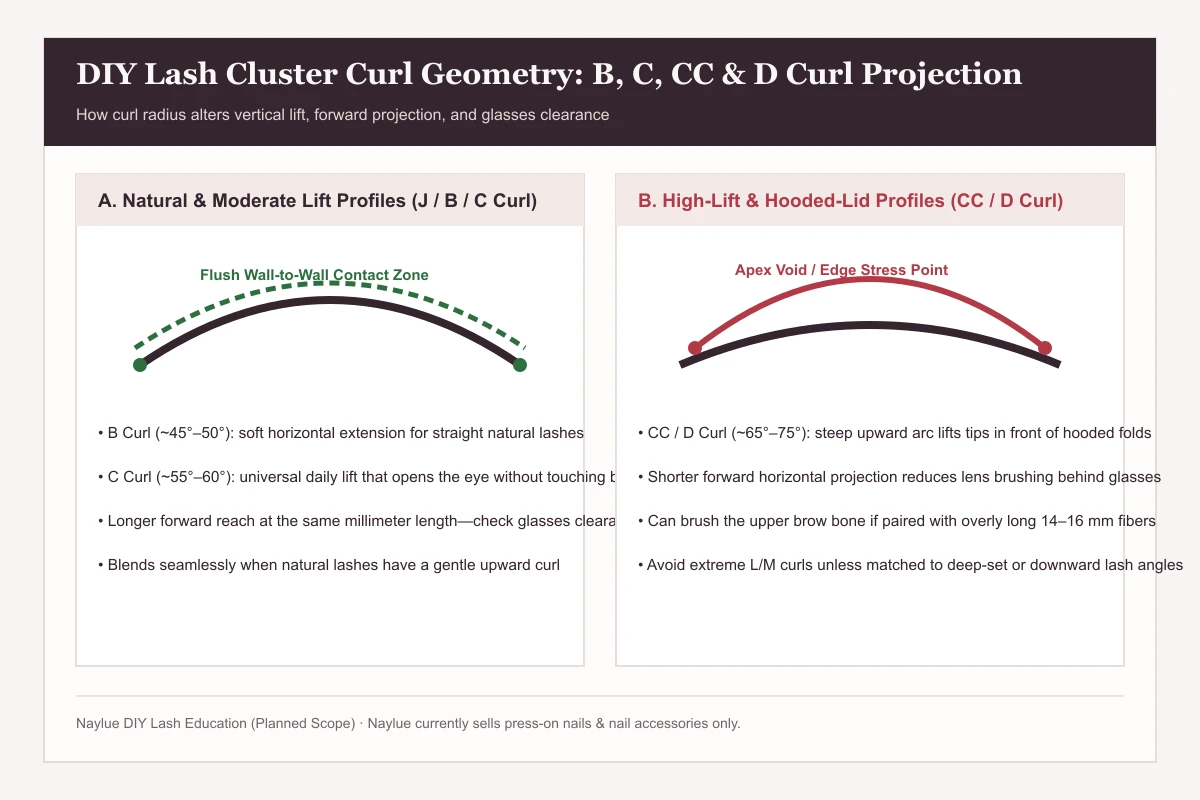
Choosing the correct curl profile is just as critical as selecting appropriate cluster lengths when designing a lash map for hooded eyes. A conventional C-curl offers a gentle, natural 50-degree upward curve that works beautifully for inner corners where the hooded fold is minimal. However, when applied directly beneath a heavy central or outer hood, a standard C-curl often curves right back into the skin fold or fails to clear the downward drape, causing the cluster tips to get pressed flat against the lid.
For pronounced hooded eyelids, D-curl and L-curl profiles provide superior structural engineering. A D-curl delivers a tight, dramatic 70-degree upward curve that projects forward before arcing upward, allowing the tips to emerge cleanly past the fold. Even more specialized is the L-curl (and L+-curl), which features a flat, straight base that mirrors the horizontal trajectory of straight natural lashes before kicking upward at a sharp 80-to-90-degree angle. This flat base maximizes adhesive contact area on the underside of the lash, while the crisp vertical kick navigates past deep, heavy skin overhangs without brushing the upper lid.
Step-by-Step Application Protocol: Constructing Your Hooded Lash Map
- Thorough Oil-Free De-Sebuming: Cleanse both eyelids and natural lashes using an oil-free foaming lash wash. Rinse with clean water and dry completely. Hooded eyelids collect excess sebum within the skin fold; removing all traces of facial oil, moisturizer, and micellar residue ensures a strong, enduring adhesive grip.
- Dry Map Assembly on Silicone Work Pad: Before picking up any adhesive, lay out your chosen cluster sizes on a sanitized silicone work pad in your target mapping order (for example: 8mm, 10mm, 12mm, 14mm, 12mm, 10mm). Having your clusters pre-oriented saves working time once the under-lash bond is applied.
- Precision Micro-Dosing with Under-Lash Bond: Remove the bond applicator wand and wipe excess product along the rim of the tube. Lightly stipple or dab the micro-spoolie along the lowest 1mm to 2mm base of your natural lashes, working entirely from underneath. Do not coat the tips, and keep the bond 1mm away from the wet waterline.
- Under-Lash Placement with 1mm Cluster Overlap: Hold precision cluster tweezers parallel to your lash line, grasp the first cluster near its tip, and gently position the micro-band onto the tacky underside of your natural lashes. Maintain the 1mm waterline gap. Place adjacent clusters with a tiny 0.5mm to 1mm overlap along their band edges to form a continuous, cohesive support structure.
- Neutral-Gaze Open-Eye Clearance Check: Immediately after placing each cluster, look directly forward into a vertical, eye-level mirror with both eyes wide open and facial muscles relaxed. Confirm that the upper lid fold does not push down on the cluster or force the fiber tips against the brow bone.
- Ergonomic Pinching and Protective Micro-Sealing: Coat the curved pads of your lash applicator tweezers with a tiny amount of bond-and-seal sealant (or wipe with an oil-free prep wipe) to prevent sticking. Gently clamp your natural lashes and the cluster bands together along the entire lash line for 3 to 5 seconds. Finally, tap the ball-tip sealant wand along the bases to lock out humidity and oil.
Zone-by-Zone Length Calibration: The 5-Zone Eye Grid
To achieve symmetry and balance across varying degrees of hooded eyelids, professional lash artists divide the lash line into five distinct structural zones. Zone 1 represents the delicate inner corner, where cluster lengths should never exceed 8mm or 9mm in a soft C-curl to prevent inner-canthus poking and premature lifting. Zone 2 spans the inner-middle quadrant, transitioning the eye gracefully from 9mm to 11mm. Zone 3 encompasses the crucial center iris area directly above the pupil, where the longest cluster (12mm to 14mm in D or L curl) creates vertical lift. Zone 4 covers the outer-middle quadrant (11mm to 13mm), maintaining structural continuity. Finally, Zone 5 governs the outer corner, where stepping down to 10mm or 11mm preserves an elegant lift while preventing the hooded fold from dragging the outer eye downward.
Longevity Care, Sebum Protection, and Damage-Free Cluster Removal
Maintaining cluster lashes on hooded eyelids requires conscious defense against facial sebum and nighttime mechanical friction. Because hooded eyelids fold over the lash line, natural oils from the upper lid crease continuously transfer onto the base of the clusters. To preserve bond integrity for 5 to 7 days, lightly brush your lashes daily with a dry silicone spoolie and avoid applying rich eye creams or oil-based serums near the upper lid crease. When sleeping, rest on your back or use a smooth silk pillowcase to prevent side-sleeping compression. When it is time for removal, never tug or pull clusters off dry, as this can fracture delicate natural lash fibers. Saturate a cotton pad with oil-free bond dissolving remover, gently press it against the underside of the clusters for 45 to 60 seconds, and allow the adhesive matrix to liquefy smoothly before sliding the clusters away.
Frequently asked questions
Why do my cluster lashes look long when my eyes are closed, but seem to disappear when I open them?
This common phenomenon is known as the hood swallow effect. In hooded eyelids, the upper tarsal skin fold drapes over the mobile lid when your eyes are open in a neutral gaze, physically concealing the base 2mm to 4mm of the natural lash line. When mapping lashes with your eyes closed, you see the full span from base to tip. To counteract this, always perform a dry check in a neutral forward gaze: choose cluster lengths that extend 2mm to 3mm longer than your desired visible length (for example, selecting a 12mm cluster to achieve a visible 9mm effect) and switch to a sharp D-curl or L-curl that projects outward before curving upward over the eyelid fold.
Is an open-eye map or a cat-eye map better for hooded eyelids?
For most hooded eye shapes, an open-eye (or reverse cat-eye) map is significantly more flattering than a traditional cat-eye. An open-eye map places the longest clusters (such as 12mm or 14mm) directly above the pupil in the center third of the eyelid, which visually lifts the heaviest portion of the hood and creates the illusion of rounder, more awake eyes. A traditional cat-eye concentrates the longest lashes at the extreme outer corner; because the hooded skin fold is typically thickest at the outer third, long heavy lashes there get pushed downward by the skin, emphasizing eyelid droop. If you prefer an elongated look, opt for a modified cat-eye that peaks 2mm to 3mm inward from the outer corner.
Why do cluster lashes cause pinching or poking when blinking on hooded eyes?
Pinching or poking on hooded lids almost always stems from two placement errors: attaching clusters directly against the sensitive eyelid waterline, or using clusters with stiff, thick bands that scrape the upper eyelid fold during blinking. Cluster lashes must always be attached to the underside of the natural lashes approximately 1mm away from the wet waterline—never directly onto the skin. Furthermore, hooded eyelids generate continuous downward friction against the lashes with every blink. Selecting featherweight clusters with ultra-fine, flexible micro-bands and pinching the roots securely with applicator tweezers ensures the band lies flat without irritating the lid fold.
How can I prevent eyelid skin oil from breaking down cluster lash bond on hooded eyes?
Hooded eyelids have greater skin-to-skin contact, causing natural sebaceous oils from the upper crease to migrate directly onto the lash line and degrade adhesive bonds faster. To maximize retention: first, thoroughly cleanse the eye area with an oil-free lash foam cleanser before application and ensure lashes are 100% dry. Second, apply under-lash bond exclusively to the lower 1mm to 2mm base of natural lashes rather than brushing through the tips. Finally, use a ball-tip sealant across the cluster bases after pinching to create a moisture- and oil-resistant protective barrier that repels eyelid sebum throughout 3 to 7 days of wear.
How do I safely remove cluster lashes from hooded eyes without damaging natural lashes?
Never pull, tug, or peel dry cluster lashes off, as this pulls out fragile natural lashes from their follicles. Apply a generous amount of oil-free lash bond remover or dual-phase eye makeup remover onto a lint-free cotton pad or micro-applicator wand. Gently press and hold the pad against the underside of the lash clusters for 30 to 60 seconds to break down the adhesive polymers. Once the bond softens, gently slide the clusters downward and away from the natural lashes with a spoolie or clean fingertip. Cleanse any remaining adhesive residue with warm water and oil-free lash shampoo.
Explore the collection: diy lash clusters & lash supplies.